I'm thinking about giving this experiment a shot:
http://www.raphnet.net/electronique/sne ... tor_en.php
I'm not afraid of damaging the controller, but I do only have one good computer. Should I try to find a POS computer first, or is this relatively safe? Has anybody else tried this?
Any input is greatly appreciated, thanks!
How risky is modifying SNES controller to fit the parallel?
Moderator: ZSNES Mods
-
jared_gibbs
- New Member
- Posts: 6
- Joined: Thu Mar 27, 2008 1:33 am
if you're concerned with soldering the snes wires to the wrong pins, you can get solder-tail DB25 sockets with the pin number next to each pin on the tail side. if you're new to DB25's, this can greatly reduce the risk of bad wiring
Hardware means nothing if you don't have good software.
Compare the success of SNES over Genisis
Compare the success of SNES over Genisis
-
jared_gibbs
- New Member
- Posts: 6
- Joined: Thu Mar 27, 2008 1:33 am
Cool, thank you all for your input. I talked to one of my buddy's that works with computers, and he agreed that the risk was fairly low.
I gave it a shot, and it worked out nicely. My only problem is that the "L" button doesn't work. I don't think it's bad soldering, because if that were the problem I think all of the buttons would have an issue. I double checked all of the connections in the controller itself, and everything looks okay. (No broken or cracked solder joints, all wires connected) I'm not sure what to try next.
So, any beginners I would say this is a good project. This was one of my first, and I got it to work. Read some tutorials, as there's a little more to soldering than just melting the solder onto wires and connection points. Flux is important, so are heat sinks, tinning the tip, etc. I never knew about these things before. Don't buy a cold heat iron, trust me.
Some of my dumber moments:
* Not buying the third hand in the first place. $20 at Radioshack. Holds the iron, comes with a cleaning sponge, magnifying glass, and of course, holds your work.
* After stripping the colored wires, there was more fibery insulation inside. I didn't do a good job of cutting it all out. These melted, made everything sticky, and made a real mess of the project. If anyone else is interested in trying this, make sure to cut all of that sh*t out or it will gunkify your project!
Again, thanks for all of your input!

I gave it a shot, and it worked out nicely. My only problem is that the "L" button doesn't work. I don't think it's bad soldering, because if that were the problem I think all of the buttons would have an issue. I double checked all of the connections in the controller itself, and everything looks okay. (No broken or cracked solder joints, all wires connected) I'm not sure what to try next.
I'm pretty new to it, but I seem to be able to get it. I'm just not very quick, so I tend to melt things (even with a heat sink) and hit contacts points I didn't mean to. I just invested in a third hand, that would have been nice to have...The risk is very VERY low, if you know how to use the iron.
So, any beginners I would say this is a good project. This was one of my first, and I got it to work. Read some tutorials, as there's a little more to soldering than just melting the solder onto wires and connection points. Flux is important, so are heat sinks, tinning the tip, etc. I never knew about these things before. Don't buy a cold heat iron, trust me.
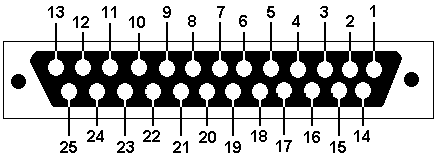
That would have been pretty handy. I managed to get by with a diagram. Although I was working with a male connector, a female diagram was better because the connector itself was flipped around (inversing the numbers). Not incredibly important, but it can reduce confusion.if you're concerned with soldering the snes wires to the wrong pins, you can get solder-tail DB25 sockets with the pin number next to each pin on the tail side. if you're new to DB25's, this can greatly reduce the risk of bad wiring
I wasn't so concerned about the $6.00 controller, but I was worried about my wife's computer! Anyway, everyone said the risk was pretty low, and I think it is. I had to correct some of my mistakes a couple of times (bad soldering) to make it work, and the port seems to be just fine.if you have to ask, you might as well play it safe.
Hah, afraid of damaging the controller? How about damaging the Parallel port so as to make it non-functional? But to do that would take some serious negligence.
Some of my dumber moments:
* Not buying the third hand in the first place. $20 at Radioshack. Holds the iron, comes with a cleaning sponge, magnifying glass, and of course, holds your work.
* After stripping the colored wires, there was more fibery insulation inside. I didn't do a good job of cutting it all out. These melted, made everything sticky, and made a real mess of the project. If anyone else is interested in trying this, make sure to cut all of that sh*t out or it will gunkify your project!
Again, thanks for all of your input!